Cupcake, Cake Pop, and Push Pop Stand General Assembly Instructions.
**Important Assembly Update**
11/1/2019
On occasion I have had customers put the support rod into the top tier from the wrong side. I have started putting donut stickers on the side the rod is to be inserted. Insert the rod end into the middle of the donut and all is good. If you see the donut after it's fully assembled, it's assembled wrong.

New stands with round spacers have a product upgrade. The top spacer only will have a wood insert that will hopefully prevent any damage that can occur when the top tier is over tightened.
Put this spacer on last.

Before we proceed, I need to explain what a T-nut is for those of you that aren't familiar with them. These nuts are used to hold the entire assembly together. There is one in the base and one in the top tier plate that are already installed for you.They look like this (uninstalled).

***REALLY IMPORTANT***
It is possible for you to push the t-nut out when you insert the rod into the base or while screwing the top tier plate on.. This is not a failure! If it does come out, simply line up the prongs with the holes they made in the wood and tap it back into place with a hammer. It is extremely important that the t-nut is fully seated into the recess. If it's not the little "teeth" will not be able to grab the wood and it will just spin and not tighten up. Now, on to assembly!
 |
| Spacers, support rod(s), and tier plates |
First locate the base. It has the felt pads to protect the table surface, and a t-nut. Unfinished stands will not have the felt pads installed. Depending on the size of your stand the base could be 12, 16, or 20". Place the base, feet down, on a table or floor.
.jpg) |
| Base (bottom view) |
.jpg) |
| Base (top view) |
Find the support rod. Remove the tape from the end of the rod. It is only there to keep the washer from getting lost. Do not remove the nut and washer. They are positioned on the rod pretty close to their final location.
.jpg) |
| Support rod, nut, and washer |
Screw the rod (the end with nut and washer) into the t-nut through the hole from the top side of the base. Turn the rod until the nut touches the washer.
Now, check the bottom of the base to make sure the rod is not protruding past the t-nut. If it sticks out, it could scratch the table top.
.jpg) |
| Rod inserted in top side of base. |
 |
| Correctly installed (View from bottom) |
.jpg) |
| WRONG! See how it sticks out? |
If the rod doesn't go in far enough or sticks out too far, turn the hex nut on the rod to adjust the length up or down.
Grab a 7/16 wrench or a pair of pliers and tighten the hex nut on top of the washer. Tighten it until it's just snug. Double check the bottom again to make sure nothing changed and the rod is not sticking out..
.jpg) |
| Tighten hex nut. |
You are ready to start stacking spacers and tiers.
Before you start putting it together, get some PAM (or cooking spray) . Spray it on a rag and wipe just the ends of the spacers where they will touch the tiers. It will help diminish any friction when tightening the whole assembly up and to keep any paint from lifting off when you take it apart. It is normal for the spacers to leave a mark or impression on the tiers. Most of you will see them already since I always put the stands together at the shop before they are taken apart and boxed up.
.jpg) |
| Spacer |
Start by sliding a spacer onto the rod.
.jpg)
Add the first tier.
.jpg)
Repeat until you get to the top tier.
.jpg)
.jpg)
.jpg)
.jpg)
.jpg)
**Important Assembly Update**
9/25/2018
New stands with round spacers have a product upgrade. The top spacer only will have a wood insert that will hopefully prevent any damage that can occur when the top tier is over tightened.
Put this spacer on last.
Now that you are ready to put the top on, please pay attention to this part. I have had people put the top on upside down. It can go on either way, but if it's on wrong the top will come off and leave the t-nut on the rod. Make sure the exposed part of the t-nut faces up (towards the sky).

Put the end of the support rod in the small hole.

Don't put it on the end of the support rod from this side. If you don't see the Tnut (Circled in red) after it's assembled, it's on wrong.
.jpg) |
| Top tier (top view) This is correct |
.jpg) |
| Top Tier (bottom side) Incorrect. Do not put it on this way. |
Start screwing the top tier on. It should go on really easy. If you meet any resistance or it feels funny, take it back off and try again. You don't want it to get cross threaded. If you do happen to pop the t-nut up out of position, take the top off and tap it back into place. When you put it back on don't push down on the top tier plate, just spin it.
.jpg)
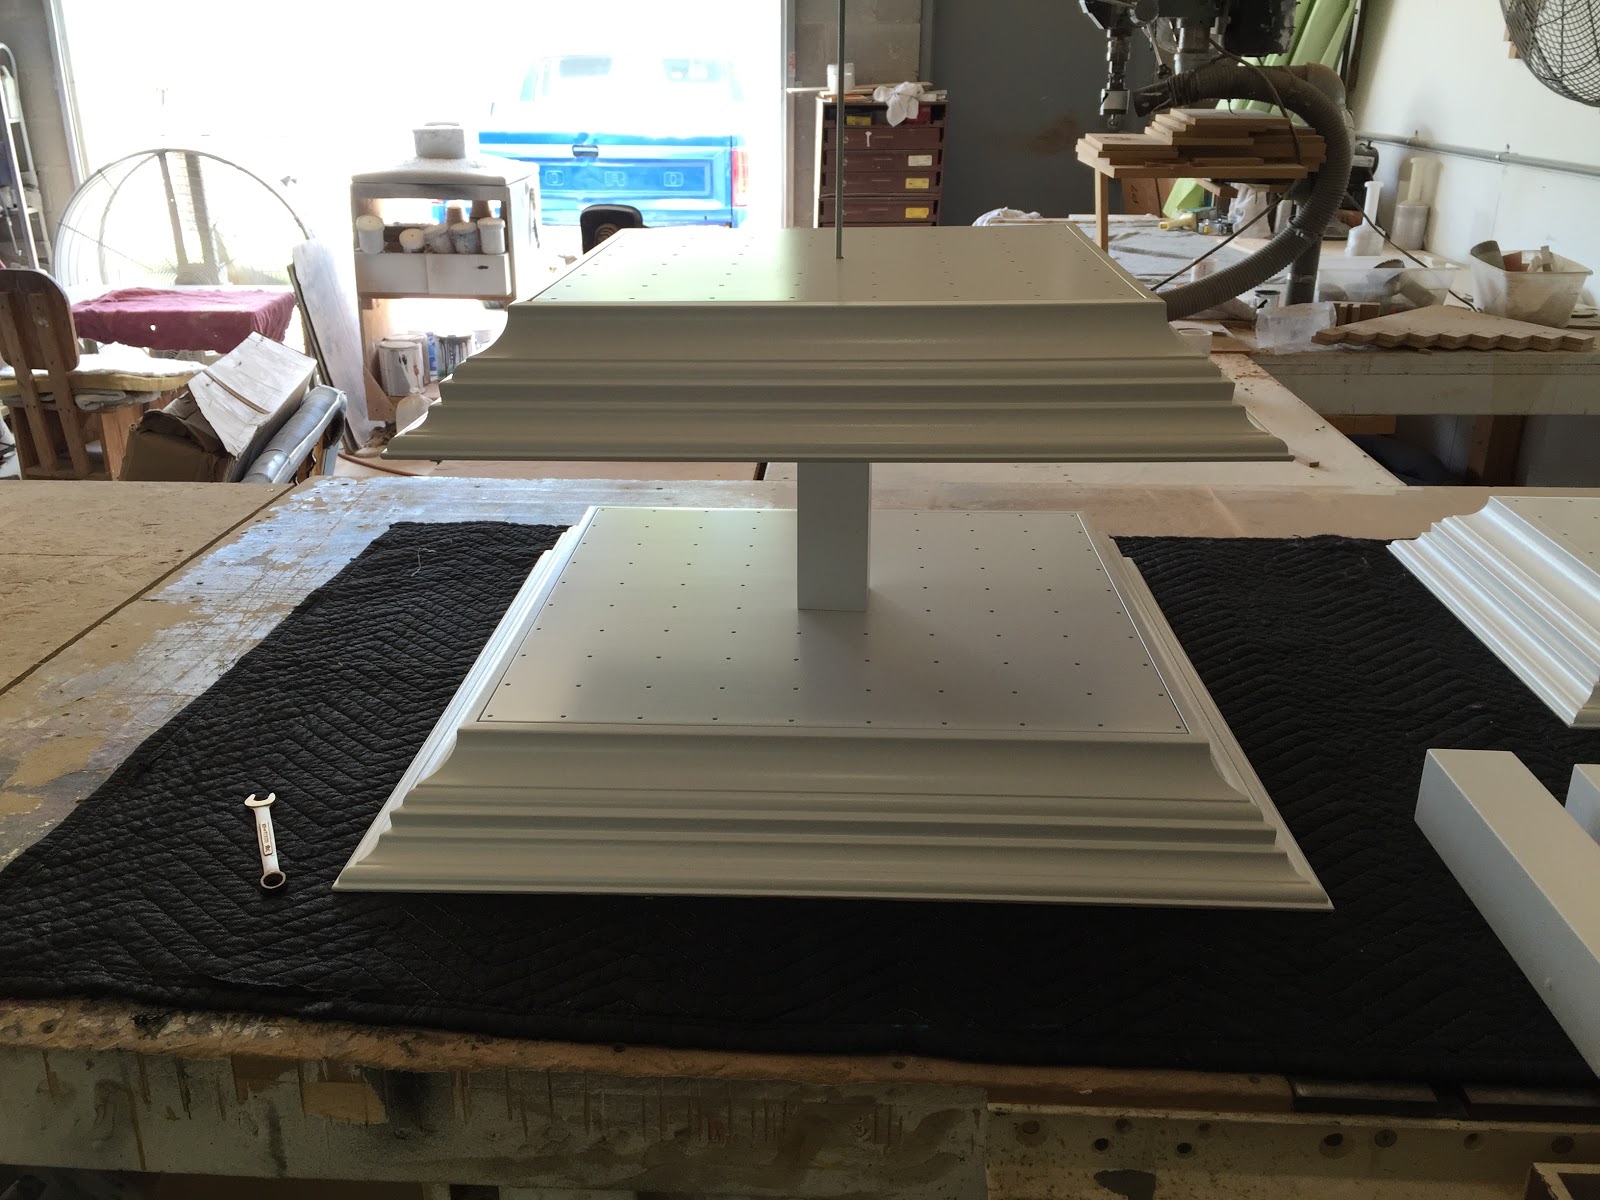
On round stands it doesn't make any difference, but on square ones, you will need to make sure the tiers are all lined up before you finish tightening the top tier. Once you are satisfied that they are, continue tightening the top until the stand becomes firm. On tall stands, they will appear very wobbly until everything is tightened up. It sometimes helps to spin a few of the lower tiers until the top is almost tight. If you do this, recheck the tier alignment and finish tightening the top. If it wobbles, something is not right. I don't build them that way. Double check that you have done everything right, and if you still have issues, call or message me.
.jpg) |
| Top tier view after tightening |
The view above and the one below should be what you end up with. If the rod is flush with the top of the t-nut or a little below, everything is fine. You just don't want it to be sticking up past the flat part of the top.
.jpg)
Now that it's fully assembled you should be able to lean it, lay it down, or even put it upside down.
.jpg)
.jpg)
.jpg)
You're done!
How To Make Your Stand Shorter
When potential customers are looking at my stands, I frequently get asked if they can be shortened for smaller events. The answer is YES!
The support rod that ties everything together is what limits it's height. To make the stand shorter all you need is a shorter rod. I can supply these for you when I build your stand or you can cut one yourself later. I explain how down the page a little.
For example, say you get a 6 tier cupcake stand from me. Typically it has tiers that are 18,16,14,12,10,and 8" with 4" spacers, and a 26" support rod. To make it a 5 tier you would change the support rod to one that is 22" long and remove one spacer and one tier. A four tier would use an 18" rod, and lose 2 tiers and spacers. You get the idea.
You can stack the tiers however you want, and even mix them up. The typically sized 8" top piece must always be on top though since it serves as the "nut" to tighten it all up.
The Do It Yourself Way
To shorten your stand you will need a length of 1/4-20 all thread rod available at hardware stores and home centers. A 6 foot piece is about $5, but they usually stock 2,3,and 4 foot pieces too. You will also need at the very least, a hacksaw.
Install the full length of the rod you purchase just as you did above in the assembly instructions. Place the amount of spacers and tiers you would like on the rod to achieve the desired height, leaving off the top tier plate. Hold the top tier plate next to the rod as in the picture and make a mark on the rod. I usually cut it just under the mark.

Before cutting the rod with the hacksaw, remove the last spacer (in case you slip!). You should end up with something like the picture below. What you DON'T want is for the rod to be too long and stick out past the tnut after you put the top on and tighten it. If it is too long, just trim off a little more.

You can now finish the assembly. Save the extra rod for possible future modifications.
I hope these instructions will help. If you have any questions feel free to contact me.
Mike
Bleacher Assembly
Assembly Instructions for bleacher style cake pop stand

Each stand has 3 supports and 3 shelves. The uprights are all identical so you can mix and match. Each shelf will have 6 screws to attach them. The long straight side of the upright supports
will be referred to as the back.

Note the position of the screw holes. One is closer to the edge than the other. These holes will face the back of the stand. If one of the shelves is narrower than the others, this one will be the top shelf.

Stand the center support up on it's back. Insert and tighten the screws until they are snug. They don't need to be really tight. Just tighten until they stop.

Do the same thing with the ends. It doesn't matter which order.

Rinse and repeat!

Add the second and third shelf. Make sure the screws get started in the pre-drilled upright holes.
Spiral Cake Pop Stand Assembly
 |
| Spiral Cake Pop Stand |
 |
| The base. The felt dots are where the first bottom strip will rest. You'll see the same dots on the first strip. |
 |
| Screw the support rod into the base. Try not to move the nut and washer from their original locations |
 |
| These 2 pictures show the correct depth the rod should be inserted. It should be flush with the bottom of the tnut |
 |
| Once the rod is inserted correctly, tighten the nut until it is snug. You can now start adding the strips that hold the cake pops. |
 |
| Find the starter strip. It's the one with the big recessed hole. This fits over the nut on the support rod. Pay attention to the "A"'s and "B"'s marked on the strips. You need to put them on in alternating order. The holes for the pops are in different locations on each. See picture below. Install the starting strip then continue stacking the strips alternating between A and B until you reach the top. Just line up all the strips for now. |

 |
| You should end up with this. Leave the knob on top pretty loose for now. |
 | ||||
| This is how you should arrange the strips for now. They don't have to be spaced like this. It just depends on how you want it to look. Start with the second strip from the bottom and swing it away from you until it's positioned like the picture. Continue this procedure all the way up. If it feels like they are getting hard to move, loosen the knob on top. Once you have them arranged to your satisfaction, tighten the top knob. You are done!
These are the general assembly instructions for my Wonky cake stands.

Screw the main center pole into the piece mounted on the base.

If your first layer is elevated off the base piece like the picture below, you will have a short spacer that goes on first. There is an angled side and a straight side. Put the angled side up.

The first layer installed
The rest of the spacers are now ready to be put on between each tier. They should rest on the cake board flat like the picture below. The picture above is the wrong way. Just turn the spacer until it rest flat on the cake board.

Keep stacking the cake boards and spacers as you build your cake on the stand. I usually leave a little extra length on the main support pole. You can cut it off if needed.
Spiral Cupcake Stand Assembly Instructions.

These are all your parts.
 Don't remove the nut and Washer. They are already in their correct location. Insert the rod into the spiral as shown. Tighten the nut. 
Install the spacer over the rod.

Screw on the base as shown. Tighten it just until it stops turning then maybe another 1/4 turn.

Carefully flip it over and install the support pipes over the dowels as shown. Start at the end of the spiral with the shortest support and work your way around.

Crown Molding Cake Pop Stand Assembly Instructions.
 
First gather all these parts. The base tier, the support rod, and the bottom support block. Leave the nut and washer on the rod in the same position it was when you unpacked the stand.

Insert the support rod through the top of the base into the bottom support block which is orientated as shown.

***IMPORTANT***
IF ANY DIFFICULTIES ARE GOING TO BE HAD DURING ASSEMBLY, THIS IS WHERE IT'LL HAPPEN.
See how the tnut in the block faces down (towards the table)? It's critical that it faces this way.
Make sure the end of the rod is screwed into the block so the end of the rod is flush with the edge of the tnut. You may need to move the hex nut on the rod up or down a little if you need to to get the rod end positioned like this.
Roll the base to this position and finger tighten the hex nut down until the rod stands up straight like this.
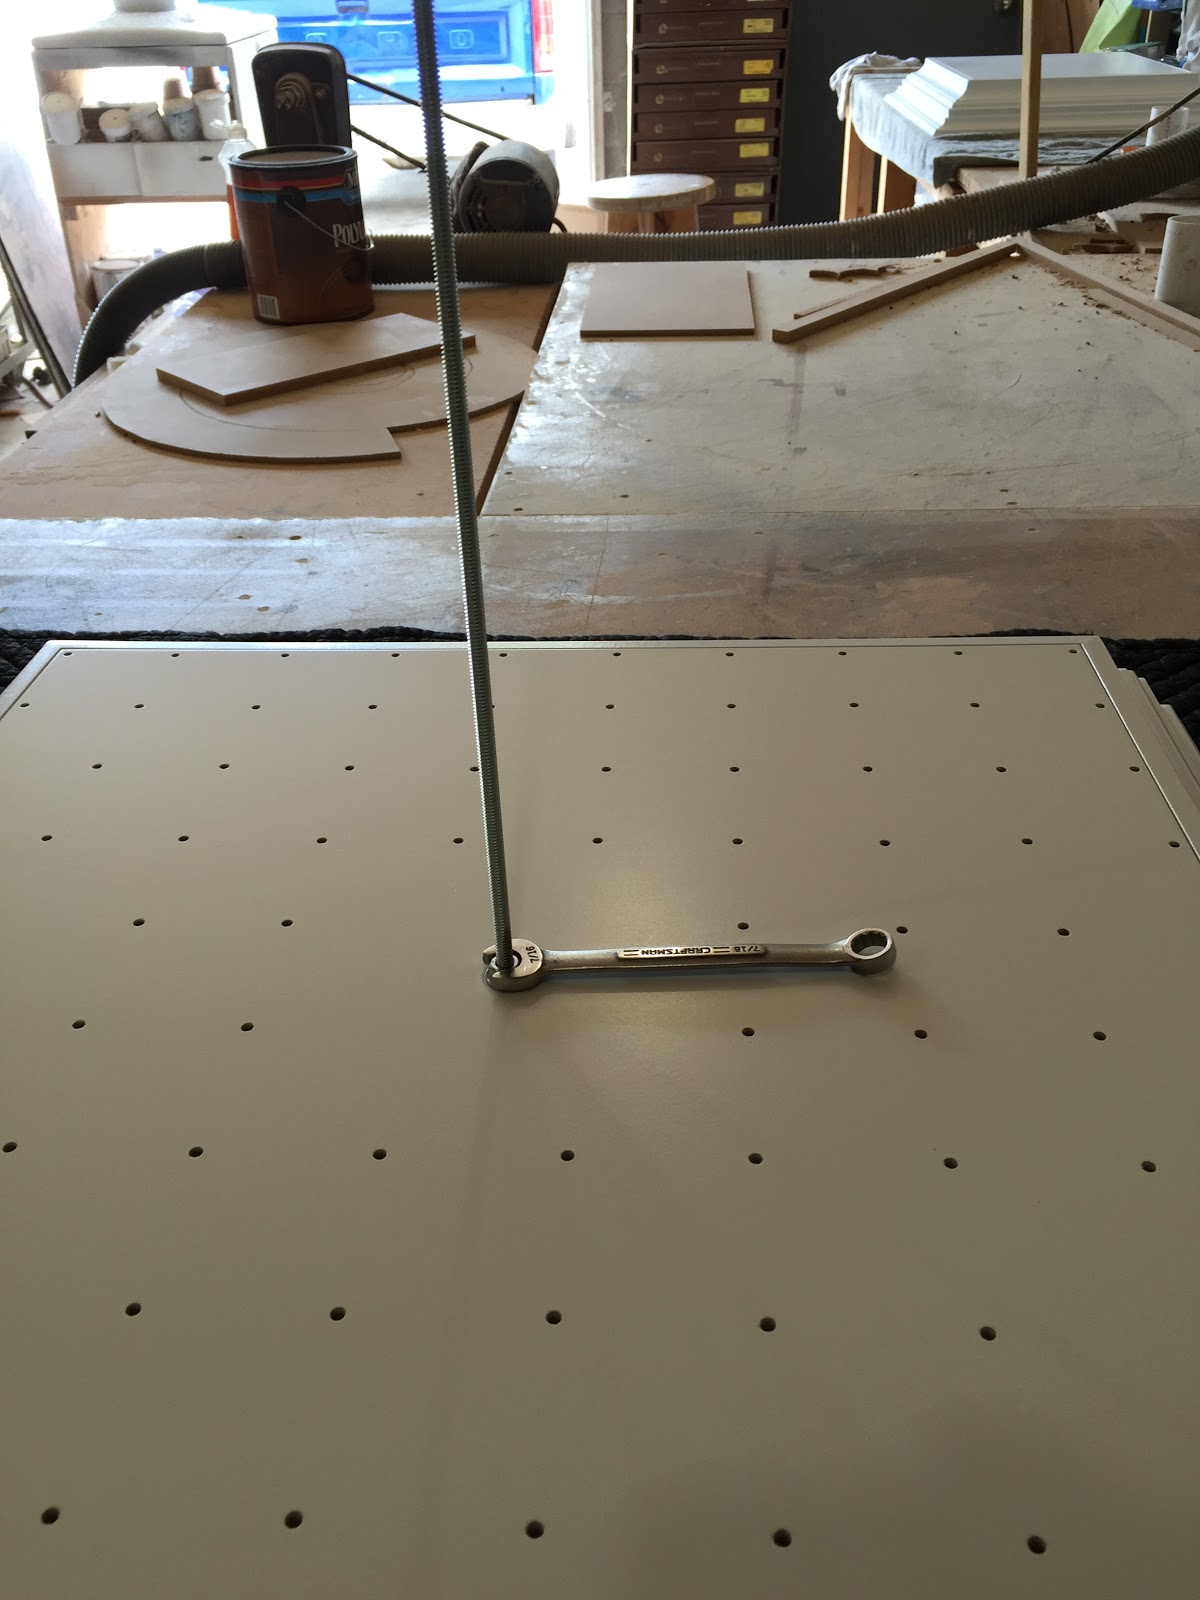
Tighten the nut with a 7/16 wrench or a pair of pliers until it is good and tight
***The hard part is done!***

Locate the bottom spacer. It has a larger hole than the others. The large hole is meant to fit over the hex nut on the rod when you slide it down into position.

It should sit flat on the base.
Add the next tier.

Add a spacer, then the next tier.

Add the last spacer.
Gently line up the hole in the top tier, and lower it onto the rod. Start rotating the top tier until it starts threading itself on the rod. Be careful it threads properly. If you meet any resistance, back it off and try again. It will screw on pretty easy.
***STOP***
Stand back and check the alignment of all the tiers and spacers before you continue to tighten the top tier.
Once you are satisfied with the alignment of everything, continue tightening the top tier until the stand feels secure. If everything was assembled correctly to this point, it should not wobble at all. If it does, something is wrong.
Contact me if you have any problems before you try to "figure it out". It could possibly be damaged if you do.

You're Done.
|

No comments:
Post a Comment